This article is part of a 4-part series on Building Custom Collection View Layouts.
- The components of UICollectionViewLayout
- Building a custom UICollectionViewLayout from scratch
- Integrating self-sizing cells in a custom layout
- Animating insertions and deletions
In the previous article, we saw the different components of UICollectionViewLayout and how they interact with each other. Today, we’ll use them to create something that most iOS developers shy away from:
We’re going to create our own UICollectionViewLayout, from scratch.
This means we’ll be calculating frames, dealing with caching, and learning all about how UICollectionView works in the process.
To work through this process, we’re going to recreate these 3 layouts. The first uses collection view cells, the second uses cells and supplementary views, and the third adds decoration views on top of all of that. It’s not the prettiest thing in the world, but it’s the perfect example to show what goes into creating a custom UICollectionViewLayout.

If you’d like to follow along, you can download the sample app below!
By the end of this article, you should have all the tools you need to create your own static custom layouts. Strap yourself in, this is going to be good!
The strategy for building great layouts
There are two major responsibilities when building a collection view layout:
- Calculating the frames of all the different elements in order to create layout attributes for them
- Managing the cache of those layout attributes
We achieve these goals by subclassing UICollectionViewLayout and overriding the appropriate methods.
The first part, calculating frames, can be tedious. I like to create a dedicated class that takes care of calculating the frame of an item given the correct inputs from the UICollectionView.
For example, the FixedColumnLayoutFrameCalculator finds the origin and size of an item inside of a section. Afterwards, it’s up to the layout to place that item properly with respect to the rest of the layout.
class FixedColumnLayoutFrameCalculator {
    // …

    public func rectForItem(at indexPath: IndexPath) -> CGRect {
    	let origin = originForItemInSection(at: indexPath.item)
    	let size = sizeForItem()

    	return CGRect(origin: origin, size: size)
    }

    private func originForItemInSection(at index: Int) -> CGPoint {
    	let column = CGFloat(index % numberOfColumns)
    	let x = column * sizeForItem().width + column * columnSpacing
    	let y = rowHeight * CGFloat(index / numberOfColumns)

    	return CGPoint(x: x, y: y)
    }

    // …
}
As for managing the cache, that isn’t difficult either. However, frustrating bugs can arise when you aren’t familiar with the lifecycle of UICollectionViewLayout. Let’s take a moment to explore that a little deeper.
The lifecycle of UICollectionViewLayout
When your collection view is displayed for the first time, here’s the general lifecycle of what you can expect:
invalidateLayout()(this can be called one or more times)prepare()collectionViewContentSize()layoutAttributesForElementsInRect()
Each of these methods needs to be overridden. Let’s see what they do!
invalidateLayout()
This method signals to the UICollectionView that its current layout is no longer valid and will be updated during the next layout cycle. This method will often be called by the system, but it’s fine for you to call it if needed.
If we’re in invalidateLayout(), we know we’re going to be changing the layout of the elements inside the collection view. Therefore, it’s a great time for us to refresh our frame calculator and delete the cache. And don’t forget to call super when you’re done!
override func invalidateLayout() {
    if let bounds = collectionView?.bounds {
    	frameCalculator = FixedColumnLayoutFrameCalculator(referenceBounds: bounds,
    													   numberOfColumns: numberOfColumns,
    													   rowHeight: rowHeight)
    }

    cellLayoutAttributes = [:]

    super.invalidateLayout()
}
prepare()
Before going through the layout process, the collection view will call this method (also called -prepareLayout in Objective-C). The default implementation does nothing, but this is an excellent place for you to initialize and calculate your cache of layout attributes. Here’s what that might look like:
override func prepare() {
    guard let collectionView = collectionView else { return }

    let sections = [Int](0...collectionView.numberOfSections - 1)

    for section in sections {
    	let itemCount = collectionView.numberOfItems(inSection: section)
    	let indexPaths = [Int](0...itemCount - 1).map { IndexPath(item: $0, section: section) }
    	indexPaths.forEach { indexPath in
    		cellLayoutAttributes[indexPath] = layoutAttributesForItem(at: indexPath)
    	}
    }
}
In this method, we create the index paths that represent our elements and iterate over it to create the UICollectionViewAttributes that we’ll be using later. Also, notice that we use layoutAttributesForItem(at:). This is another method that we will override. We’ll get to it a bit further on in the article.
It’s important to do these calculations upfront so the layout isn’t stuck trying to figure this out as you scroll. This also allows you to prepare for the next part of the lifecycle, how convenient!
collectionViewContentSize
This is a computed variable where the UICollectionView asks the layout to figure out the size of its scrollable area. The default implementation returns a size of .zero, so you’ll need to make sure this is taken care of.

In our case, for a vertical scrolling list, the width of the content will be the width of the collection view, and the height of the content will be the maxY of the last cell.
override var collectionViewContentSize: CGSize {
    get {
        guard let collectionView = collectionView else { return .zero }
        guard collectionView.frame != .zero else { return .zero }

        let width = collectionView.frame.width
        let height: CGFloat

        if let lastLayoutAttributes = lastLayoutAttributes() {
            height = lastLayoutAttributes.frame.maxY
        } else {
            height = 0
        }

        return CGSize(width: width, height: height)
    }
}
layoutAttributesForElements(in rect:)
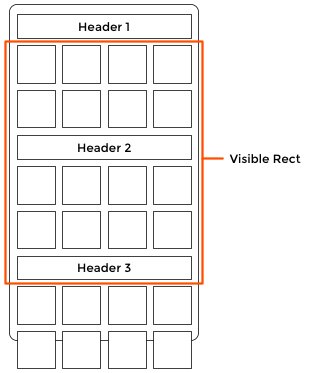
And finally, layoutAttributesForElements(in rect:) is where the magic happens. When this method gets called, you’re given a rect which represents the visual area of the collection view. It’s your job to figure out which layout attributes — calculated previously in prepare() — fall within with that rect. Here’s an image of what that looks like:
If you’ve never done this before, this might sound tedious. Luckily, you can often get away with something like this:
override func layoutAttributesForElements(in rect: CGRect) -> [UICollectionViewLayoutAttributes]? {
    return cellLayoutAttributes.values.filter { rect.intersects($0.frame) }
}
You simply filter your cached layout attributes using the intersection of the CGRect you’re passed as a parameter.
Using the array you generated, the collection view will know which elements it needs to display. Pretty cool, n’est-ce pas?
Handling rotation (and other size changes)
There’s another part of the layout life cycle worth considering: how do we know when the size of our collection view changes? This can happen when your app rotates or when using multitasking on iPad, so you need to be ready for it.
Luckily, if we’ve properly handled the earlier part of the lifecycle, we’ll only need to implement one other method: shouldInvalidateLayout(forBoundsChange:).
When the bounds of the scroll view change, this is called by the system to ask whether the current layout is still correct, or if it should be scrapped and recalculated.
However, keep in mind that scrolling will change the bounds. This means that as you scroll, this method will be called repeatedly. Therefore, you want to make sure that you’re only scrapping the layout if you really need to.
In our case, we can compare the width of the newBounds to the current one. If the width is different, we can assume that our layout should change and be recalculated. In this case we return true.
override func shouldInvalidateLayout(forBoundsChange newBounds: CGRect) -> Bool {
    guard let collectionView = collectionView else { return false }

    return newBounds.width != collectionView.bounds.width
}
Displaying cells
In addition to layoutAttributesForElements(in:), you’ll also need to override layoutAttributesForItem(at:). This method returns the layout attributes of a given cell. Here’s an example from the sample code:
override func layoutAttributesForItem(at indexPath: IndexPath) -> UICollectionViewLayoutAttributes? {
    if cellLayoutAttributes[indexPath] != nil {
        return cellLayoutAttributes[indexPath]
    }

    let frame = frameForItem(at: indexPath)
    let attributes = UICollectionViewLayoutAttributes(forCellWith: indexPath)
    attributes.frame = frame

    return attributes
}
In this method, we return the cached value if it exists. However, if it doesn’t, we use this method to calculate the new layout attributes so we can add them to the cache. This is where our frame calculator from earlier comes into play.
And there you have it! If your collection view only displays cells, then you’re done! We’ve now reached the 1st layout of the sample app.
Let’s get started on the second layout, which incorporates supplementary views.
Displaying supplementary views.
Adding UICollectionViewSupplementaryView to your layout isn’t difficult, but it does require extra care. Let’s take a look at how we can add headers to our layout.
First of all, we’ll have to update the prepare() method so we can initialize and cache the layoutAttributes. As with our cells, we want to generate the layout attributes of our supplementary views before heading into to the layout process. Since our headers will always have a fixed size, this isn’t too complicated. Note that we’re taking the same approach with layoutAttributesForSupplementaryView(at:), where we check to see if a cached value exists, and if it doesn’t, we calculate it ourselves.
override func prepare() {

    // …

    for section in sections {
        headerLayoutAttributes[section] = layoutAttributesForSupplementaryView(ofKind: UICollectionElementKindSectionHeader, at: IndexPath(item: 0, section: section))

        // …

    }
}
We also need to adjust the frame calculation of our cells. Since our headers take up space in our layout, we need to shift them down the right amount.
private func frameForItem(at indexPath: IndexPath) -> CGRect {
    // …
    let rowInSection = indexPath.item / numberOfColumns
    let sectionHeightOffset = offset(for: indexPath.section)
    let y = sectionHeightOffset + CGFloat(rowInSection) * rowHeight + rowHeight

    return CGRect(x: frameInSection.minX, y: y, width: frameInSection.width, height: frameInSection.height)
}
Moving on, we also need to change the layoutAttributesForElements(in rect:) method to make sure we find and return the layout attributes of the supplementary views, in addition to those of the cells.
override func layoutAttributesForSupplementaryView(ofKind elementKind: String, at indexPath: IndexPath) -> UICollectionViewLayoutAttributes? {
    if headerLayoutAttributes[indexPath.section] != nil {
        return headerLayoutAttributes[indexPath.section]
    }

    let frame = frameForHeaderSupplementaryView(section: indexPath.section)
    let attributes = UICollectionViewLayoutAttributes(forSupplementaryViewOfKind: UICollectionElementKindSectionHeader, with: indexPath)
    attributes.frame = frame

    return attributes
}
And finally, we need to make sure we delete the cache of layout attributes in the invalidateLayout method.
override func invalidateLayout() {
    // …
    headerLayoutAttributes = [:]
    // …
}
And just like that, we’ve reached the second layout of the sample code. To finish things off, let’s have a look at how we can integrate decoration views into our layout.
Displaying decoration views
Our approach here will be similar to what we did with supplementary views. We need to update prepare() to cache the layout attributes of the decoration views, and we need to update invalidateLayout to empty the cache when it’s no longer needed.
Once again, we’ll use layoutAttributesForDecorationView(at:) to return the cached value if it exists, or calculate the layout attributes from scratch if they don’t.
override func layoutAttributesForDecorationView(ofKind elementKind: String, at indexPath: IndexPath) -> UICollectionViewLayoutAttributes? {
    if backgroundLayoutAttributes[indexPath] != nil {
        return backgroundLayoutAttributes[indexPath]
    }

    let frame = frameForBackgroundDecorationView(in: indexPath.section, for: indexPath.item)
    let attributes = UICollectionViewLayoutAttributes(forDecorationViewOfKind: elementKind, with: indexPath)
    attributes.frame = frame

    return attributes
}
We’ll also update layoutAttributesForElements(in:) to return the layout attributes of our decoration views, in addition to those belonging to supplementary views and cells.
override func layoutAttributesForElements(in rect: CGRect) -> [UICollectionViewLayoutAttributes]? {
    let visibleCellLayoutAttributes = cellLayoutAttributes.values.filter { rect.intersects($0.frame) }
    let visibleHeaderLayoutAttributes = headerLayoutAttributes.values.filter { rect.intersects($0.frame) }
    let visibleBackgroundLayoutAttributes = backgroundLayoutAttributes.values.filter { rect.intersects($0.frame) }

    let visibleLayoutAttributes = Array(visibleCellLayoutAttributes) + Array(visibleHeaderLayoutAttributes) + Array(visibleBackgroundLayoutAttributes)
    return visibleLayoutAttributes
}
And finally, we’ll adjust the z-index on the layout attributes of our different elements to make sure our decoration views aren’t on top of the rest of our elements.
Let’s take a step back and contemplate what we’ve made
Wow, you’ve made it to the end! Congratulations for sticking to it!
Together, we created a UICollectionViewLayout from scratch. What’s more, we’ve gained a deeper understanding about how the layout class decides which elements it needs to show, as well as how it manages to remain performant when scrolling rapidly.
We also saw the basic lifecycle of initializing and invalidating a collection view layout, and how we can plug ourselves into this lifecycle in order to create our own collection view.
However, we’ve left out an important component: self-sizing cells. Next time, we’ll see how we can use Auto Layout to drive the heights of our cells while keeping all the logic inside our collection view layout.