This article is part of a 4-part series on Building robust, reliable code with NSOperations.
- Getting Started With NSOperation and NSOperationQueue
- Chaining a Series of NSOperations
- Grouping Common Operations Together
- Handling UI with NSOperations
This article focuses on the basics of Operation and OperationQueue so you can start using them in your own apps. It also lays the groundwork for the cool stuff we’ll be doing in subsequent parts. If you’d like to follow along with a playground, you can find the gist over this way 👉 Operations Part 1
Let’s dive in!
What is an Operation?
At its core, Operation is an abstract class used to model a unit of work. It works in tandem with OperationQueue to create very sophisticated behaviour which would otherwise be incredibly tedious to implement.
In other words, Operations are like blocks of code with superpowers.
What kind of superpowers?
- They are reusable within your project, and often between projects.
- They are multi-core aware, so you’re always using as many cores as possible on the device.
- They know about thread quality of service, so the OS can make intelligent decisions about resource management.
- They are priority-aware, meaning you can tell the system what’s important (loading more tweets) vs. what’s not-so-important (downloading user avatars).
- They are testable, making your code robust
ᕦ(ò_óˇ)ᕤ
Not bad eh?
As for what can you run inside an Operation, well, that’s really up to you. Here are a few examples to whet your appetite:
- Fetching data from a web server.
- Showing a UIAlertController to the user.
- Triggering a segue in a
UIStoryboard - Requesting permission for Push Notifications
Excited? Of course you are! Let’s look at how they work.
The life of an Operation
Operations have a well-defined lifecycle that you can hook into. However, it’s not quite implemented in the way you’d expect.
At a high level, the lifecycle looks like this:
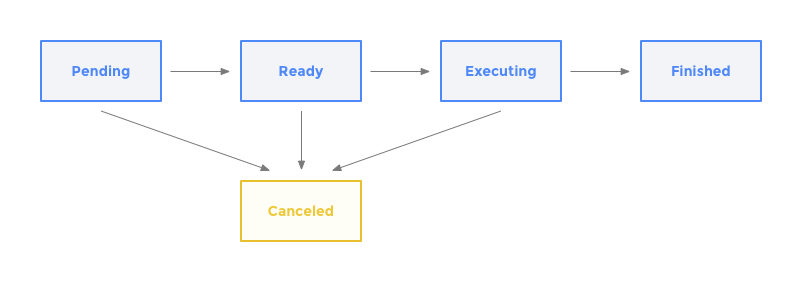
These states are controlled by 4 KVO-enabled boolean properties: isReady, isExecuting, isFinished and isCancelled.
Operations start in the Pending state when they are first added to a queue. Nothing really interesting to see here. The 4 flags are all false
At some point, when an Operation becomes ready to execute, it moves to the Ready state. It’s now eligible to be executed by the OperationQueue. isReady now equals true and all the other flags equal false.
(Actually, there’s a little more that goes into Operations becoming Ready, and we’ll talk more about it in part 2 of this series.)
Then the operation moves to the Executing state. This means it’s currently doing its thing (i.e. executing its main() method). isReady and isExecuting equal true and the other 2 flags equal false.
Finally, when it’s done, the operation moves to the Finished state. At this point, isExecuting equals false and isFinished equals true. Do notice, however, that this state provides no indication as to whether or not the operation was successful. This’ll be important to keep in mind for later ☝️
Also, at any point before it’s finished, an Operation can be cancelled. This moves it to the Cancelled state (isCancelled is true).
Cancelling Operations
Cancelling means exactly what you would expect it to: abort whatever you are doing and clean up as soon as possible. You can cancel an Operation by using its cancel() method and you can check if it was cancelled by using its cancelled property.
There’s a catch to this though. Since the meaning of “cancel” can change from operation to operation, it’s up to you to periodically check the isCancelled flag during the execution of your operation in order to stop execution and/or clean up any ongoing tasks. This could amount to cancelling a URLSessionTask, for example.
Operations and Queues
Now that we’ve seen how Operations work, it’s important to take a step back and have a look at our hero’s sidekick: the OperationQueue.
OperationQueues are what we use to run Operations. They take care of all the nitty gritty, like priorities, dependencies, and moving the Operations from state to state.
You can add an Operation to a queue by using the addOperation(_:) method. It looks something like this:
let fetchPokemon = FetchPokemonOperation()
let operationQueue = OperationQueue()

operationQueue.addOperation(fetchPokemonOp)
Easy right? You just add the operation, sit back, and wait for it to execute.
Much like Operations, OperationQueues have a few interesting properties and methods as well.
- Since an
OperationQueuewill only executeOperationsthat are in theReadystate, it may choose to execute the 4th operation in the queue if the first 3 are stillPending. Therefore, make sure you don’t confuse this queue with a more traditional FIFO (first in, first out) queue, because you’ll end up being quite surprised 🙃 - The
isSuspendedflag allows you to start and stop an operation queue. In the next article, we’ll see how we can make use of this property for some interesting behavior. By default, queues are not suspended (i.e.isSuspendedis false). maxConcurrentOperationCountallows you to set how many operations you want to execute at once. By default, it’ll run as many as possible. Usually this is fine. By setting this value to 1, you can create a serial queue.QualityOfServiceallows you to set the default service level of the threads on which the operation will execute. Service levels dictate the priority with which theOperationwill gain access to system resources, such as CPU and disk access. Using the default here will work, but if you want to be a good citizen, you should consider setting this property to what is most appropriate. You can check out the doc here.
Ok, enough about queues. Let’s move onto actually building these things!
Building our first Operation
Building an Operation can be very easy: all you need to do is subclass the Operation class and override the main() method. And let’s not forget to exit early if the Operation has been cancelled 💁♂️
An Operation that logs to the console looks something like this:
class LoggingOperation : Operation {
    override func main() {
        if isCancelled {
            return
        }

        print("Logging operation")
    }
}
When the Operation becomes ready to execute, the OperationQueue will run its main() method. Once the main() method is completed, the operation’s isFinished flag gets set to true and the operation gets removed from the queue.
However, this can cause issues with long running, asynchronous tasks.
Imagine you create an operation to download data from a server. What do you think will happen once we reach the end of the main() method?
The main() method will complete before the URLSessionTask returns. This means that your operation will no longer exist by the time the data returns from the server.
Not cool.
In order to make sure your operation is still around, we’ll need to take control of its lifecycle. Lucky for us, the documentation is quite robust when it comes to overriding this behavior.
It states that we need to correctly manage the isExecuting flag and the isFinished flag. Here’s what that looks like, KVO notifications and all:
class ConcurrentOperation: Operation {
    private var backing_executing : Bool
    override var isExecuting : Bool {
        get { return backing_executing }
        set {
            willChangeValue(forKey: "isExecuting")
            backing_executing = newValue
            didChangeValue(forKey: "isExecuting")
        }
    }

    private var backing_finished : Bool
    override var isFinished : Bool {
        get { return backing_finished }
        set {
            willChangeValue(forKey: "isFinished")
            backing_finished = newValue
            didChangeValue(forKey: "isFinished")
        }
    }

    override init() {
        backing_executing = false
        backing_finished = false

        super.init()
    }

    func completeOperation() {
        isExecuting = false
        isFinished = true
    }
}
We’ve effectively created a base class for all the concurrent operations we’ll create in the future. It overrides both isExecuting and isFinished, as well as adding a new method called completeOperation(). This is the method we’re going to call in order to tell the rest of the system that our operation is, in fact, finished.
But beware! When using this base class, we’ll need to make sure that all code paths lead to completeOperation(). Otherwise, the operation will never finish, and thus never get removed from the queue.
With this new ConcurrentOperation base class, let’s look at what a download operation would look like:
class FetchPokemonOperation : ConcurrentOperation {
    private var task: URLSessionDataTask?
    var data: AnyObject?

    override func main() {
        if isCancelled {
	    completeOperation()
            return
        }

        let session = URLSession(configuration: .ephemeral)
        let request = URLRequest(url: URL.init(string: "http://pokeapi.co/api/v2/pokemon/151/")!)

        task = session.dataTask(with: request, completionHandler: { (data, response, error) in
            if self.isCancelled {
	        self.completeOperation()
                return
            }

            //Be a good citizen and handle errors, ok? :)

            let parsedResponse = try! JSONSerialization.jsonObject(with: data!)
            self.data = parsedResponse as AnyObject
            print(self.data!)
	    self.completeOperation()
        })

        task?.resume()
    }
}
As you can see, we now subclass ConcurrentOperation as opposed to Operation, and we’ve also added a call to completeOperation() inside the completion block of our data task.
If we try running this, we’ll see that it completes successfully since we’re keeping the operation alive during the duration of its execution.
Great job! 🙃
Where do we go from here?
Let’s recap! Today we took our first look at Operations and OperationQueues. We created Operations and executed them using an OperationQueue. We also looked at how we could hook into their lifecycle to ensure that our concurrent tasks stay alive long enough.
Next week, we’ll see how we can use multiple operations together. Now that we’ve laid the groundwork, we’ll look at how we can chain multiple Operations together in order create complex behavior in a very simple way.
I hope you’ll join me next week!
If you enjoyed the article, you can follow me on Twitter and share it with your friends! If you want to make sure to be notified of part 2 (which is where we really get into the powerful stuff), you can sign up to the email list in the footer below!
Happy coding ✌️