There’s been a lot of back and forth recently about Apple’s style of MVC. Is it something we can work with in the real world? Or is it lacking?
I think the main idea is that by using composition, you can create complex view controller interactions while keeping your view controllers small.
Today, let’s look at how we can use an MVC approach to handle an extremely common, yet often problematic scenario. In other words, let’s look at how we can implement loading, error and empty views in an application.
Defining The Problem
For this article I’ll be modifying my sample app todo.
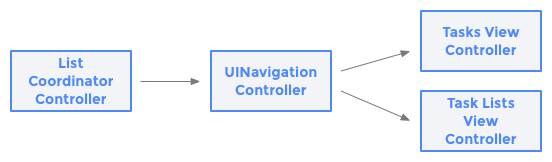
The current view controller hierarchy looks like the figure below. The root view controller is a ListCoordinatorController. It handles a UINavigationController and creates the view controllers that get pushed on it, namely the TasksListsViewController and the TasksViewController.
From a developer’s point of view, this type of structure is fine. It allows you to easily work on loading and displaying data.
However, at a certain point you’ll need to add polish. In our case, it means communicating to the user exactly what’s going on. Is the screen loading? Is the table empty? Is there an error? If so, can we retry? These situations are all extremely common, so we need to account for them.
I like approaching this type of problem by making as few changes as possible to the UIViewController displaying the content. It’s already really good at displaying data, but it doesn’t have anything to do with displaying the state of data transfer. Let’s do our best to move that responsibility elsewhere.
The simplest way to do this with the MVC approach is to add another UIViewController to our hierarchy. This gives us an additional layer of abstraction to work with. Let’s call it the StatefulContentViewController. Its job is to listen to the state of its content controller and coordinate with its loading view controller, error view controller and empty view controller.
Using our example above, if we were to implement this change with our TasksListsViewController, our new hierarchy would now look like this:
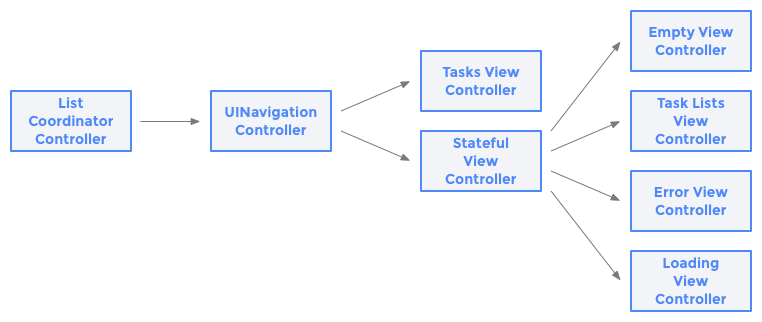
I’ll admit, there are a lot more boxes there than there were before. However, this is tradeoff we make in order to keep our view controller small and concise.
Building a Container View Controller
Now that we know which problem we’re trying to solve, let’s roll up our sleeves and get to work. As always, we start with dependencies: what do we need in order for this view controller to work?
We can safely assume that our content controller will be a required dependency, whereas the other state controllers (i.e. the empty, loading and error controllers) will be optional. So far, we have a class that looks like this:
class StatefulContainerViewController: UIViewController {
    public let contentViewController: UIViewController

    public var errorViewController: UIViewController?
    public var emptyViewController: UIViewController?
    public var loadingViewController: UIViewController?

    public init(with contentController: UIViewController) {
    	self.contentController = contentController

    	super.init(nibName: nil, bundle: nil)
    }
}
We also need to track the state of the content. Is it loading? Is there an error? If so, what is the error? Since all of these states are mutually exclusive, we can use an enum to track this property.
enum LoadingState {
    case unloaded
    case loading
    case loaded
    case empty
    case error(Error)
}
We also need to figure out how exactly we plan on obtaining the current state of our content. There are a few approaches we could use here. We could use a delegate protocol or KVO, but that’s a little too invasive. I think the best way of approaching this is to use a protocol to define how we expect the data to be loaded.
This allows the controller to return the Result of its operation, and we can figure out our state from there. Below is a simple implementation of StatefulContentLoadable:
protocol StatefulContentLoadable {
    func loadContent(completion: @escaping (Result) -> ())
}

enum Result {
    case success(Int)
    case error(Error)
}
Our view controller from above now looks like this. By calling the loadContent() method, we not only trigger the fetching of our content, but we also trigger the different state changes inside our StatefulContainerViewController.
class StatefulContainerViewController: UIViewController {
    public let contentViewController: (UIViewController & StatefulContentLoadable)

    public var errorViewController: UIViewController?
    public var emptyViewController: UIViewController?
    public var loadingViewController: UIViewController?

    public init(with contentController: (UIViewController & StatefulContentLoadable)){
    	self.contentController = contentController

    	super.init(nibName: nil, bundle: nil)
    }

    public loadContent() {
        self.currentState = .loading

        contentController.loadContent { result in
            let nextState: LoadingState

            switch result {
            case .success(let count):
                nextState = count > 0 ? .loaded : .empty
            case .error(let error):
                nextState = .error
            }

            self.transition(to: nextState)
        }
    }

    private func transition(to state: LoadingState) {
        //switch and swap child view controllers
    }

    // Boring code that switches between child view controllers
}
(Interested in the real thing? You can grab the full implementation using the form below)
Integrating Our New View Controller
Now that we have our StatefulContentViewController ready to go, let’s see what it looks like in use. Here’s the original method implementation from todo that builds and pushes the TasksViewController:
func transition(to taskList: TaskList) {
    let controller = TasksViewController(taskList: taskList)
    controller.delegate = self

    rootNavController.pushViewController(controller, animated: true)
    controller.loadContent()
}
And here’s what it looks like with all its new statefulness built in:
func transition(to taskList: TaskList) {
    let controller = TasksViewController(taskList: taskList)
    controller.delegate = self

    let statefulController = StatefulContentViewController(with: controller)
    statefulController.emptyViewController = EmptyViewController()
    statefulController.errorViewController = ErrorViewController()
    statefulController.loadingViewController = LoadingViewController()

    rootNavController.pushViewController(statefulController, animated: true)
    statefulController.loadContent()
}
Not bad! Here we can see that most of code stays intact. However, now we wrap our TasksViewController in the StatefulContentViewController we just built. We set a few simple view controllers to display the various states we care about, and voilà! We’re done.
What’s more, we went through this exercise by making only minimal changes to our original content controller.
With MVC, and with software development in general, composition is the way to go!