Breaking up massive view controllers can be difficult. When we look at a 3000-line controller, we know it should be smaller, but we often don’t know where to start. Some view controllers simply feel like they need to be massive because they display many model objects and provide all sorts of interaction.
Sure, you could try using something like MVVM, but then you’ll end up with a massive view model. That doesn’t solve the problem, it just moves it elsewhere.
Figuring out a framework for breaking up view controllers is something I’ve thought about ever since I shipped my first iOS app many years ago. In my most recent project, I think I’ve finally stumbled upon something that I’m happy with.
Today, let’s explore different “kinds” of view controllers we can create and how they compose together. These are all subclasses of UIViewController, of course, but they perform very different roles inside of our app.
I hope you’ll start seeing how versatile UIViewController can be, beyond simply showing stuff to the user. Maybe you’ll even be inspired to break up your own view controllers!
Let’s get to it 😅
Again with the Single Responsibility Principle?!
If you ask anyone about breaking up view controllers, they’ll often tout the Single Responsibility Principle, as if that’s helpful.
(I know this because that’s exactly what I used to do. No one found it helpful 😬)
They’ll tell you to move code out of the view controller and into the view, or out of the view controller and into the model.
And guess what? Your view controller is still going to be huge!
The difficulty with SRP is not remembering to break things up, it’s about finding responsibilities that are concise and composable.
This is why I often use multiple layers of view controllers to accomplish a task. It allows me to separate concerns in a way I’ve never seen others do. Some of these view controllers are meant to be used only once, while others are meant to be reused throughout the application. (And others, throughout multiple applications!)
So let’s dive into this using an example from my app NetDeck.
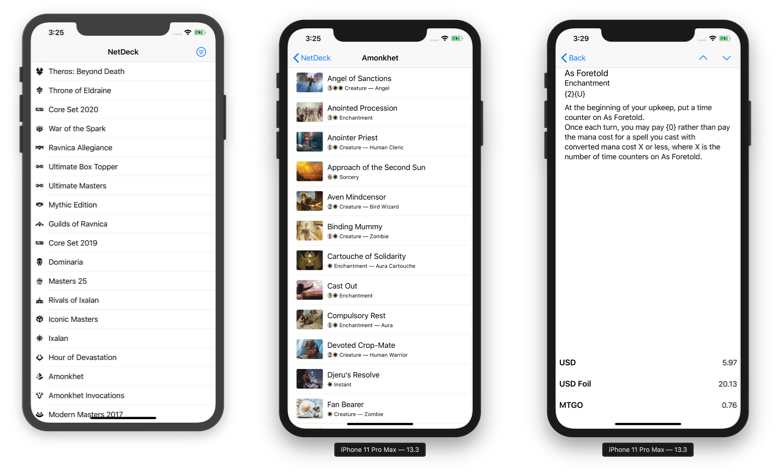
There’s a list of Magic: the Gathering expansions, that drills down into a list of cards, that drills down into card details and prices. Pretty standard stuff. Care to guess how many different view controllers are at work within these three screens?
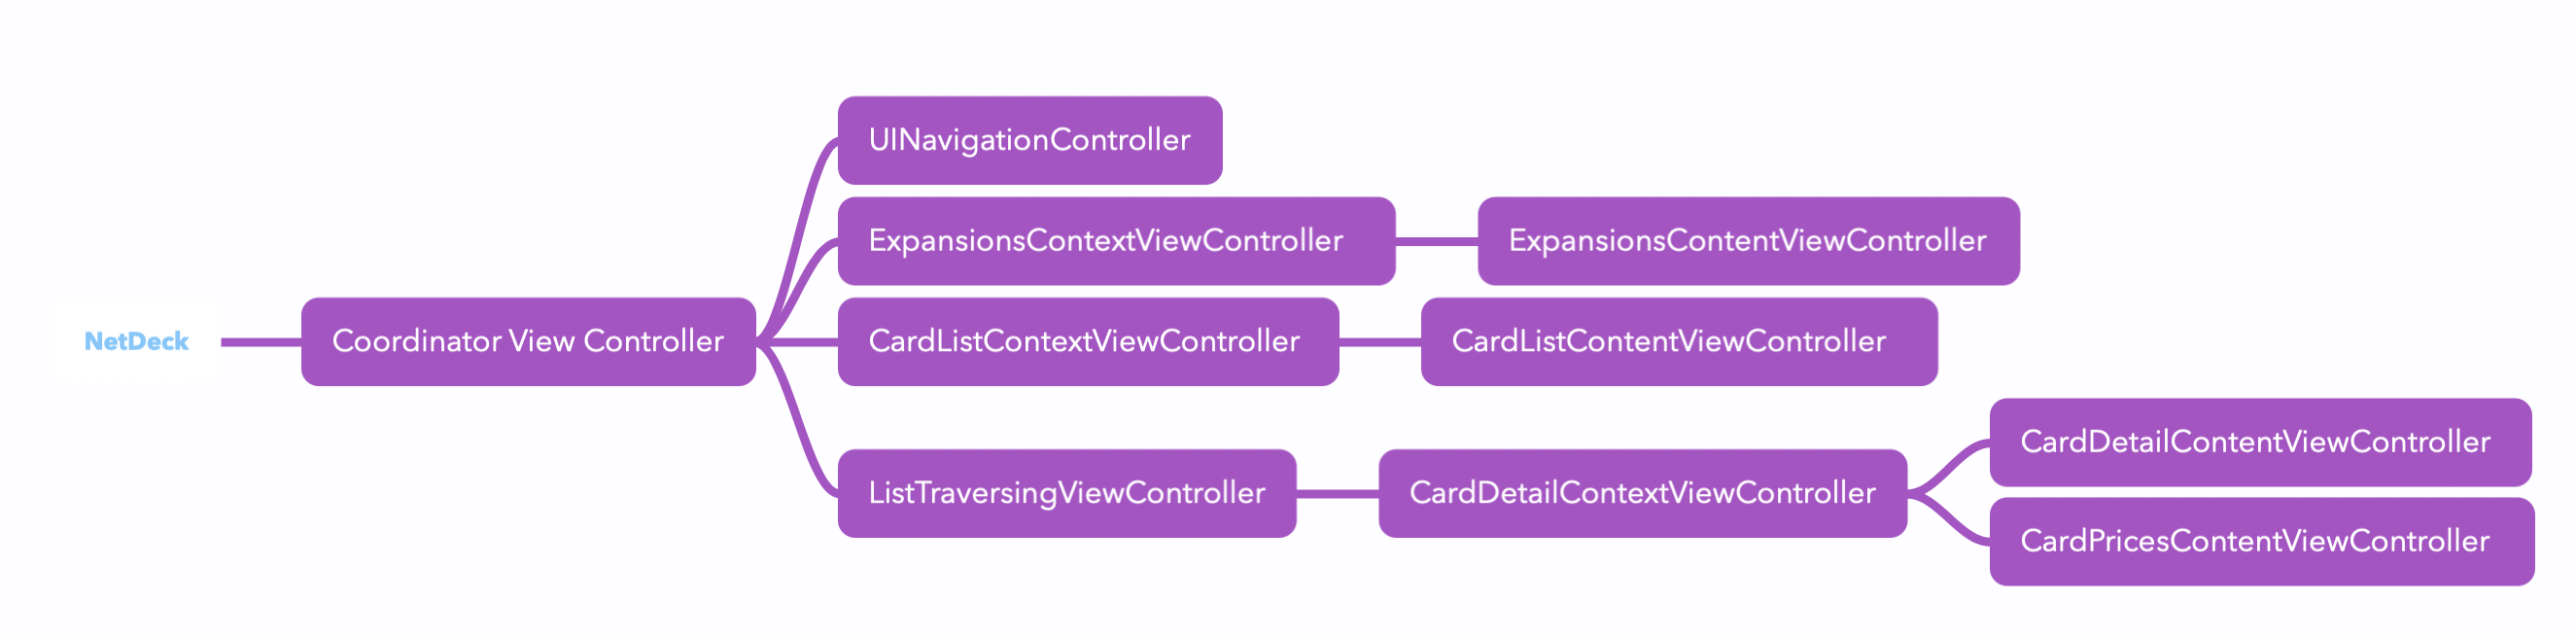
For this flow, I’m using 10 view controllers. One of those is a UINavigationController, and all the others are custom subclasses. The hierarchy is outlined below. Sounds like a lot for 3 screens? Let me show you why…
Content View Controllers
A good place to start is at the bottom of our view controller hierarchy, and that’s where we find the content view controller.
Content view controllers play the essential role of showing “stuff” to the user. They are the lists and detail views of your app. However, what makes them special is what they don’t do:
- They don’t fetch data.
- They don’t care about where they’re shown in your app.
- They don’t contain extraneous views, like loading or empty views.
Content view controllers aim to be as simple and as versatile as they could possible be. They expose a public API through which you can configure them, but they don’t handle any business decisions. They are completely agnostic to where they are shown, how they are shown, and where their data comes from. This makes them extremely simple to build, easy to test, and ideal for snapshotting.
If we refer back to our flow above, we can see 4 different content view controllers:
- The list of expansions
- The list of cards
- The details of a card
- The price of a card
That’s right, they don’t even need to define a whole screenful of content. The card detail screen view is actually made up of two content view controllers. Whenever it makes sense, strive to break up your view controllers into the smallest possible pieces.
I love working with content view controllers because they force you to reduce the API surface area of the content you’re working with. You can often get away with an initializer, a few simple public methods, and a small delegate protocol.
Then, from the point of view of the rest of your application, it is far easier (and cleaner) to deal with a concise, black-box controller.
Context View Controllers
One level up in the hierarchy are context view controllers. These provide the dependencies to the different content view controllers in your app.
These are the view controllers which are aware of their place in the app. Often, your context view controllers will be one-off view controllers that will configure one (or multiple) content view controllers and display them.
They can take care of starting network requests, or calling out to Core Data, or whatever else. They are injected with the minimum amount of dependencies required and they transform them into whatever the content VC needs.
For example, you could initialize a context view controller with a model object that was selected, which then gets transformed into a fetch request, then into a NSFetchedResultsController, and finally a data source that gets passed to your content view controller.
More often than not, they don’t provide their own UI. They simply lay out the ContentViewController and handles its events.
As we saw earlier, the can also manage more than one content view controller. In the card detail view below, I’m using 2 different content view controllers (one that displays the card data, and the other displays the price data)
These view controllers can sometimes be reused within an application, but often they aren’t. They are purpose-built to bind content to a particular use-case within your app.
Container View Controllers
Container view controllers are something we’re all used to. UINavigationController, UISplitViewController and UITabBarViewController are all first class examples of these.
They are view controllers that have minimal UI and wrap other view controllers, usually for navigation.
What makes these controllers special is that they’re so versatile: they can be reused across many different applications, since the problem they solve often universal.
Apple provides us with a handful of useful containers, but they aren’t the only ones who can build them. These types of containers can manifest themselves in our own applications. Some examples include:
- A bottom sheet view controller, like in Maps.app
- A side tab bar controller, like in Twitter for iPad
- A drawer view controller, like in every banking app on the planet 😬
- A loading/empty/error state view controller, as you probably use in your own apps.
These are all examples of view controllers that can be made generic and reusable across any app. Instead of cluttering your view controller with their functionality, you can move all of this into its own controller and cut down on a lot of cruft.
In our example, notice the two little arrows in the top right corner of the card detail. Those arrows allow you to traverse the list of cards without ever leaving the detail view.
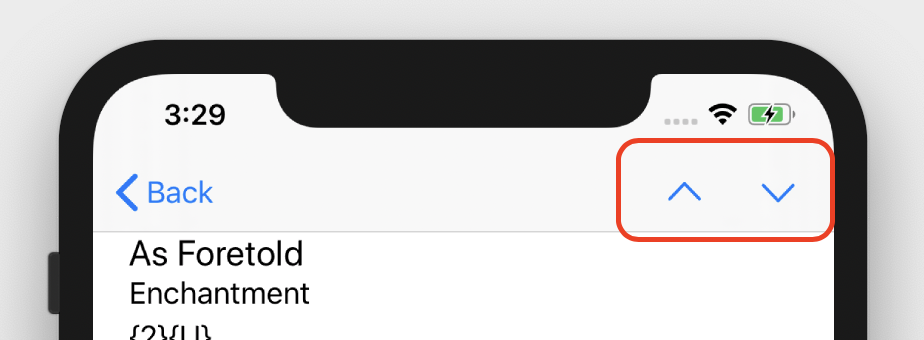
If you download the sample app, you’ll see that ListTraversingViewController has no dependency on any business logic of the app. All you need to do is set it up with a list of items, the current item, and set up its delegate, and you’re good to go.
Remember, container view controllers are at their best when they aren’t tied specifically to your app. You could potentially put this view controller in its own module and reuse it without jumping through many hoops.
Coordinator View Controller
Finally we get to the root of our hierarchy, the coordinator view controller.
I like thinking about coordinators as the code-only analogue of UIStoryboard. These view controllers represent a flow of screens in your application.
One of the reasons why I love coordinators so much is that they allow you to think about your app at a more abstract level. You can map out how the different parts interact in terms of flows instead of constantly living in the weeds of your content.
As with Context View Controllers, they are also an ideal place to hold relevant state that is important to that flow and needs to be persisted between view controllers.
Imagine your own application: you might have an onboarding flow, a main flow, a sign up flow, and a search flow. Your coordinator hierarchy might end up looking something like this:
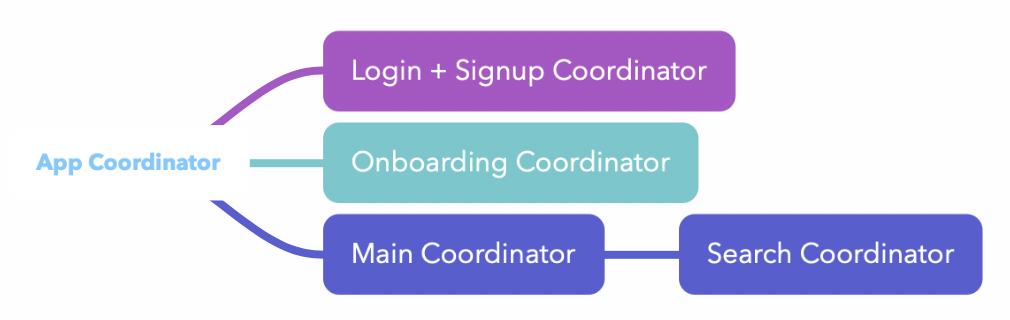
The number of screens in your onboarding or sign up flows are irrelevant. When you look at your app in terms of flows, their purpose becomes clear.
Up until recently, my coordinator view controllers had a tendency to become pretty big since they encompassed so much configuration. They would take care of transforming dependencies and setting up container view controllers. But since I’ve integrated Context view controllers into the mix, all the configuration that used to live in the coordinator has moved to a more appropriate location.
And now it’s your turn
As we talked about earlier, the difficulty with splitting up massive view controllers isn’t figuring out what to remove, it’s about finding a place for the stuff you’re moving out.
If you want to see how all these view controllers fit together, I’ve prepared a sample app that uses all of these concepts so you can play around with it on your own!
I hope this overview gives you a new appreciation for the different roles view controllers can play, and inspires you to try out some of these techniques in your own apps.