Every iOS application is built on data, and that data is often presented using UITableView or UICollectionView. As such, apps end up with all sorts of different data sources.
Some conform to UITableViewDataSource, others to UICollectionViewDataSource. Some fetch their data from the web, and some fetch their data from Core Data.
This creates all sorts of code duplication. We copy pasta the same methods over and over. The code is almost the same, but not quite.
In the spirit of “Don’t Repeat Yourself” (DRY), we’ll look at how we can build our datasources from smaller, more generic pieces. Together, we’ll see: - How we can reuse more code in our projects - How we can use composition and dependency injection to build complex behaviours - How we can use this stuff to build apps faster
Data sources, how do they work?
The UITableViewDataSource and UICollectionViewDataSource protocols are the interface between our UI and the data we want to present. These protocols have 2 responsibilies: providing data and preparing it for presentation. It turns out that we can use this separation in a very practical way. We can use it as a seam between what’s reusable (i.e. providing data) and what’s custom (i.e. presenting data).
Therefore, we’re going to set out to build something like this:

Glad to have you along for the ride! Let’s get started! 🚙💨
Data Provisioning
Data provisioning is all about getting the data from wherever it is and making it available to the rest of the system. This means we need to fetch it from somewhere (the web, a file on disk, or a simple Array) and make it available to the rest of the app (via itemAtIndexPath:, numberOfSections, numberOfItemsInSection:, etc).
To model this, we’ll use two different protocols (we’ll explain why later).
The first is DataProvider, which takes care of loading the data and mapping between NSIndexPath and our model. It looks something like this:
@protocol DataProvider
@required
  - (id)itemAtIndexPath:(NSIndexPath *)indexPath;
  - (NSIndexPath *)indexForItem:(id)item;
  - (void)loadDataWithCompletion:(void(^)(NSError *error))completion;
@end
One thing to note is the presence of the loadDataWithCompletion: method. This will allow us to load data asynchronously and update the UI only once the data is ready. From the view controller’s point of view, loading data would look something like this:
- (void)loadData {
  //Show loading view
  [self.dataSource loadDataWithCompletion:^(NSError *error) {
    //Remove loading view
    if (error) {
      //Show error view
    } else {
      [self.tableView reloadData];
    }
  }];
}
The second protocol for data provision is simply to return section info. I like to call this fellow SectionInfoProvider. Its methods will look familiar 🙃
@protocol DataSectionInfoProvider <NSObject>
@required
  - (NSInteger)numberOfSections;
  - (NSInteger)numberOfItemsInSection:(NSInteger)section;
@end
Concrete data provider
Now that we have our protocols, lets create a concrete data provider. The simplest case is providing data from an Array, which would look something like this:
@interface FRKArrayDataProvider ()
@property(nonatomic, strong) NSArray *items;
@end

@implementation FRKArrayDataProvider

- (instancetype)initWithItems:(NSArray *)itemsArray {
    self = [super init];
    if (!self) {
        return nil;
    }

    _items = itemsArray;

    return self;
}

#pragma mark - FRKDataProvider

- (void)loadDataWithCompletion:(void (^)(NSArray *errors))completion {
    if (completion) {
        completion(nil);
    }
}

- (id)itemAtIndexPath:(NSIndexPath *)indexPath {
    return self.items[indexPath.item];
}

- (NSIndexPath *)indexForItem:(id)item {
    NSInteger index = [self.items indexOfObject:item];

    if (index != NSNotFound) {
        return [NSIndexPath indexPathForItem:index inSection:0];
    } else {
        return nil;
    }
}

#pragma mark - FRKSectionInfoDataProvider

- (NSInteger)numberOfSections {
    if (self.items.count > 0) {
        return 1;
    } else {
        return 0;
    }
}

- (NSInteger)numberOfItemsInSection:(NSInteger)section {
    return self.items.count;
}

@end
As you can see, there’s no magic going on here. We initialize our ArrayDataProvider with an array, and it takes care of supplying the necessary info. Since we’re not doing any asynchronous initialization, we can simply run the completion block in loadDataWithCompletion: and be on our way. I bet this already looks similar to some of your own data source classes.
As another example, here’s a link to one that I’ve made for Core Data. I encourage you to check it out! It’s initialized with an NSFetchRequest and an NSManagedObjectContext in order to use an NSFetchedResultsController behind the scenes.
As you can see, it’s fairly unremarkable. It simply takes care of forwarding methods to the NSFetchedResultsController.
(And that’s what I like. Simple code that works 😎)
What’s more, both these data providers are UI agnostic. They can be used with UITableView and UICollectionView. Heck, you could probably even use them with UIPickerView if you wanted to.
Now let’s move onto presenting this data.
Data Presentation
The second piece of the puzzle is getting this data onto the screen. The methods we most care about when presenting data are registering the UI for the correct cells, and building those cells from the appropriate model. With this in mind, we can use a protocol that looks something like this:
@protocol TableViewDataPresenter <NSObject>
@required
  - (void)registerCellsForTableView:(UITableView *)tableView;
  - (UITableViewCell *)tableView:(UITableView *)tableView cellForItem:(id)item atIndexPath:(NSIndexPath *)indexPath;
@end
Unlike the DataProvider above, this part isn’t UI agnostic. As you can imagine, the corresponding Data Presenter protocol for UICollectionView is similar, but not quite the same. This is the custom part you implement on a case-by-case basis to supply the cells you want.
Concrete Data Presenter
Much like before, a concrete data presenter isn’t too complex. Here’s an example from a project I’m working on:
@implementation ExpansionDataPresenter

- (void)registerCellsForTableView:(UITableView *)tableView {
    [tableView registerClass:[NDKExpansionTableViewCell class] forCellReuseIdentifier:NDKExpansionCellReuseIdentifier];
}

- (UITableViewCell *)tableView:(UITableView *)tableView
                   cellForItem:(NDKExpansion *)item
                   atIndexPath:(NSIndexPath *)indexPath {
    NDKExpansionTableViewCell *cell = [tableView dequeueReusableCellWithIdentifier:NDKExpansionCellReuseIdentifier forIndexPath:indexPath];
    [cell updateWithExpansion:item];

    return cell;
}

@end
Easy peasy lemon squeezy. Nothing to see here. Move along.
Putting it all together
So far we’ve created providers and presenters, but now we’ll create our actual data source. Using the adapter pattern, we can build a thin layer between our UI and the classes we built earlier. Its job is to coordinate between our other components. Once we initialize it with a DataProvider and a DataPresenter, it’ll forward its methods to right objects.
Also, this is where our separate protocols from earlier come into play. In order to use the functionality we created in our DataProvider, we want our data source adapter to conform to both UITableViewDataSouce and DataProvider. This will give us access to methods like itemAtIndexPath: and loadDataWithCompletion: at the data source level. However, we don’t want to conform to SectionInfoProvider because we’d be duplicating methods that are already on UITableViewDataSource. Let’s keep our interfaces clean 💁♂️
Here’s a link to a gist containing the UITableViewAdapter. FRKTableViewAdapter on Github
Like I mentioned earlier, this is a thin layer. I apologize if you expecting something more exciting, but again, there isn’t much action going on here. Just a bunch of method forwarding.
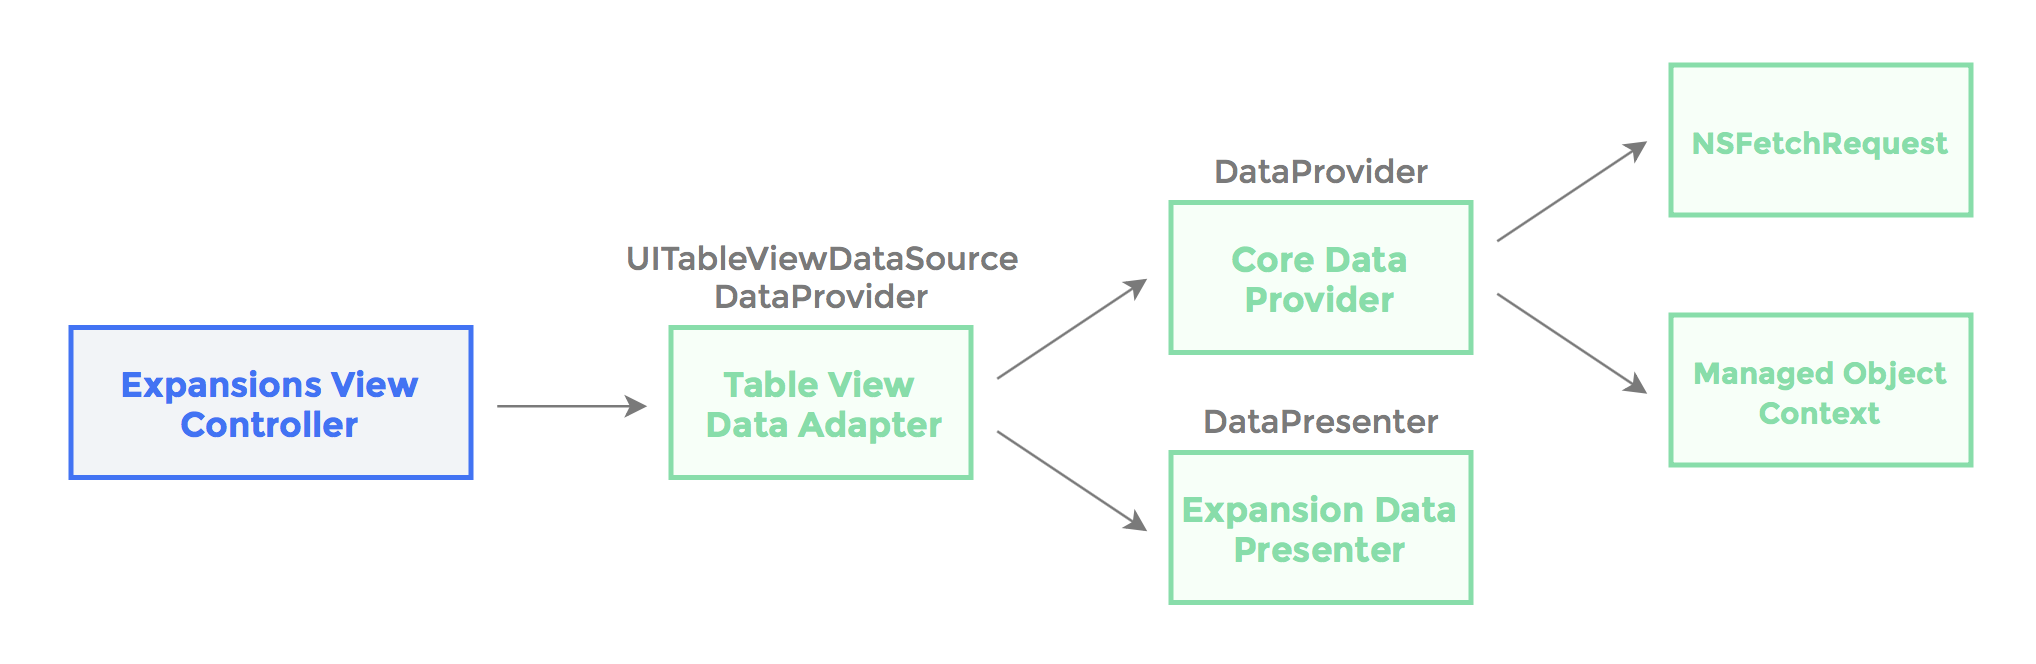
Great! Now that all the pieces are in place, here’s what initialization looks like for a typical view controller:
- (UIViewController *)createExpansionsViewController {
  NSFetchRequest *fetchRequest = //Create fetch request
  FRKCoreDataProvider *provider = [[FRKCoreDataProvider alloc] initWithFetchRequest:fetchRequest moc:self.childMOC sectionKeypath:@"keypath"];

  ExpansionDataPresenter *presenter = [[ExpansionDataPresenter alloc] init];

  FRKTableViewAdapter *adapter = [[FRKTableViewAdapter alloc] initWithDataProvider:provider dataPresenter:presenter];

  NDKExpansionListTableViewController *expansionsTableController = [[NDKExpansionListTableViewController alloc] initWithDataSource:adapter];

  return expansionsTableController;
}
Isn’t that rather elegant? Just have a look at this beautiful dependency graph.
And now, let’s go on a brief dependency injection tangent in order to point out what’s going on above.
- Our
CoreDataProvideris being injected aNSFetchRequest, aNSManagedObjectContextand a section keypath, making it both reusable and easy to test. - Our
TableViewAdapteris being injected a data provider and a data presenter, also making it reusable and easy to test. - Our
ExpansionListTableViewControlleris being injected its data source (as aTableViewAdapter), making it easy to test and completely decoupled from where its data comes from.
Breaking up our larger components into smaller ones pays dividends in big projects, and this is a great example of this practice at work!
What does building a Data Source look like now?
So how do you make a new data source with this approach?
First, we look in our bag of DataProviders for one that’s suitable for our needs. Do we need to present data from a file? From the net? If we have one already built, great. If not, we build it ourselves! It’s just a couple of protocols to implement, after all.
Then we build an appropriate DataPresenter. This is the part that is always going to be custom, so there’s no getting away from it. Make sure you register your cell and build it correctly.
Then we stick them both of these components in a UITableViewDataSourceAdapter or a UICollectionViewDataSourceAdapter.
And then we’re done! We pass the adapter to our controller where it can take care of the rest.
What have we accomplished?
Let’s take a step back to point out what we’ve accomplished here, and why this can be better than the approach we had before. Here are the benefits that immediately come to mind:
- This approach encourages code reuse in your projects. Data providers are often reusable. Your
TableViewAdapterandCollectionViewAdapterare reusable. If you’re building a new view controller, you simply need to create a newDataPresenterand you’re good to go. - This approach allows you to reuse code between
UITableViewandUICollectionView. In my opinion, this is a massive gain. There’s so much code that’s similar between the two, and this allows us to leverage this similarity. - This makes building view controllers really easy. As you’re building your view controller, use an
ArrayDataProviderwith mock data. Once you’re ready, switch it out for aDataProviderthat hits the web. - The compositional approach we use here doesn’t require any complex subclass hierarchies – we’re just combining small blocks together. It feels like building code out of Lego!
- There’s no magic. The code is boring. All it does is take existing data source responsibilities, put them in nice little boxes, and make them reusable. This makes the library easy to maintain and easy to add features to.
- This approach doesn’t require any special controller subclasses. You’re not locked in to some framework that’s a pain to remove later. It’s a data source that acts like a data source.
And from personal experience, I’ve been using these data sources in my own apps for a little while now, and they’ve certainly made my life easier.
Where to go from here?
I encourage you to try this strategy and run with it. Here are some ideas that I’ve implemented that have worked out great:
- You can create an Adapter and Data Provider that support pagination.
- You can add diffing in your adapters in order to have nice reloads with performBatchUpdates:.
- You can compose multiple Adapters together to create static sections with dynamic content.
As for myself, I’m currently rebuilding this library in Swift, and TDD-ing my way through it. Being able to use generics and the strong type system is a boon to an approach such as this one. It’ll be up on Github once it’s ready :)