The delegate pattern isn’t glamorous, but it’s the workhorse of view controller communication. Knowing what to delegate and when to delegate is essential to mastering iOS architecture and keeping your view controllers manageable.
In this article, you’ll learn:
- What the delegate pattern is
- The philosophy behind why it works so well
- How to use the delegate pattern properly in your own circumstances
Let’s hop right in!
What is a delegate, really?
Imagine you’re at your friend’s place and he wants you to make your famous guacamole. You start the process and ask him for an avocado. He hands you one. You ask him for cilantro. Boom, you have cilantro. You ask him for an onion. He doesn’t have any, so he runs out to the store and gets you one. You ask him if he likes it salty, he responds no, so you don’t add any salt. You finish up your recipe and hand him the guacamole.
This is delegation.
In the example above, you’re a GuacamoleMaker, your friend is a GuacamoleMakerDelegate. You’re in an unfamiliar environment (your friend’s place) so you have no choice but to delegate out many of your concerns. Therefore, your friend provides you with avocados, cilantro and onions. From your point of view, you don’t really care where the ingredients come from as long as your friend is around to hand them to you. Your friend is involved in some decision-making, like whether or not to use salt. And to finish it off, you let him know when the guac is done so you can both enjoy it together.
In other words, you had a task that needed to get done, but you didn’t have everything you needed in order to do it. Luckily, your delegate was around to help you out. In a way, you could say that you were “decoupled” from your environment.
In our code, this exact situation comes up time and time again.
Why delegate?
Before we hop into how to create a delegate, it’s important to understand why this pattern is so ubiquitous.
First of all, like we saw in the first part of the series, we want to reduce coupling between our classes. The delegate pattern is an easy way to do just that in parent-child relationships. It allows our classes to work with higher level objects without them knowing concretely what those objects are.
For example, a UITableView will pass on its selection (via tableView:didSelectRowAtIndexPath:) to whoever is setup as its delegate. And this makes a lot of sense: a generic UITableView doesn’t know what to do with selection. That’s entirely based on the context in which it’s used.
Naming-wise, the noun ‘delegate’ might conjure an image of subordination. However, in practice, the delegate of an object is often its parent. The parent conforms to the delegate protocol and receives messages at the will of the child object.
Also, it’s the type of pattern that promotes hierarchy, which is what we want to strive towards. It’s much easier to deal with a hierarchy of small objects than with a jumbled mess.

What to delegate
There are 3 major categories of behaviors you’ll want to delegate. Not every delegate protocol will use all three: pick and choose what makes sense for your situation.
By far, the most common category is when you want to let your delegate know that something has happened. UITableViewDelegate and UICollectionViewDelegate are great examples of this. For instance, didSelectItemAtIndexPath tells the delegate that an item was selected at a given index path. These types of delegate methods typically return void.
The second category of delegate methods are those that ask for approval. In UIKit, you’ll recognize these methods because they start with should... and return a bool. Methods like shouldHighlightCellAtIndexPath: allow an external object to change the behaviour of the current object without needing to know any implementation details.
Finally, the third category of delegate method is the one that provides data. UITableViewDataSource, despite being called DataSource and not Delegate, is still the delegate pattern at work. The data source calls out to for data, and a different object responds. In other words, you could imagine this protocol being called UITableViewDataDelegate.
In iOS applications, the first category of delegates is the one you’ll come across most often. The second and third categories become more common when building frameworks or other generic components. The more generic an object is, the fewer assumptions they can make about the context in which they’re used in. Building in these kinds of delegate methods allow for better customization and control.
The technical nitty-gritty
Let’s see how we can add a delegate to a class. To add a delegate to your view controller, you want to first start by creating a protocol, and adding a delegate property to your VC.
protocol MyChildViewControllerDelegate: AnyObject {
}

class MyChildViewController: UIViewController {
	weak var delegate: MyChildViewControllerDelegate?
}
Right off the bat, there are a few things to notice here:
First of all, the delegate is marked as weak. This is normal, and completely necessary. Setting up a delegate essentially creates a circular reference, which could lead to memory leaks. Using the weak attribute ensures that these memory leaks won’t happen.
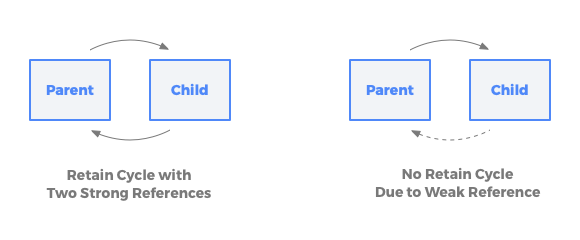
Secondly, notice that the delegate protocol extends AnyObject. This is necessary because it tells the compiler that only classes — as opposed to structs — can conform to this protocol. The reason for this is clear: only classes (with their reference semantics) can be placed inside a weak variable.
Finally, you’ll notice that the delegate is optional. Since the variable is weak, the compiler has no guarantee that the delegate will be around for the lifetime of our object. Since it could be nil, our delegate property is an optional.
Next, we need to add a delegate method to our protocol. Otherwise, it ain’t gonna do much!
Let’s say that we want to notify our delegate that a button was pressed inside our controller. Our delegate method would look something like this:
protocol MyChildViewControllerDelegate: AnyObject {
	func didSelectButton(in controller: MyViewController)
}
There’s something interesting to notice here: this method passes MyViewController as a parameter to the delegate. Why is that so?
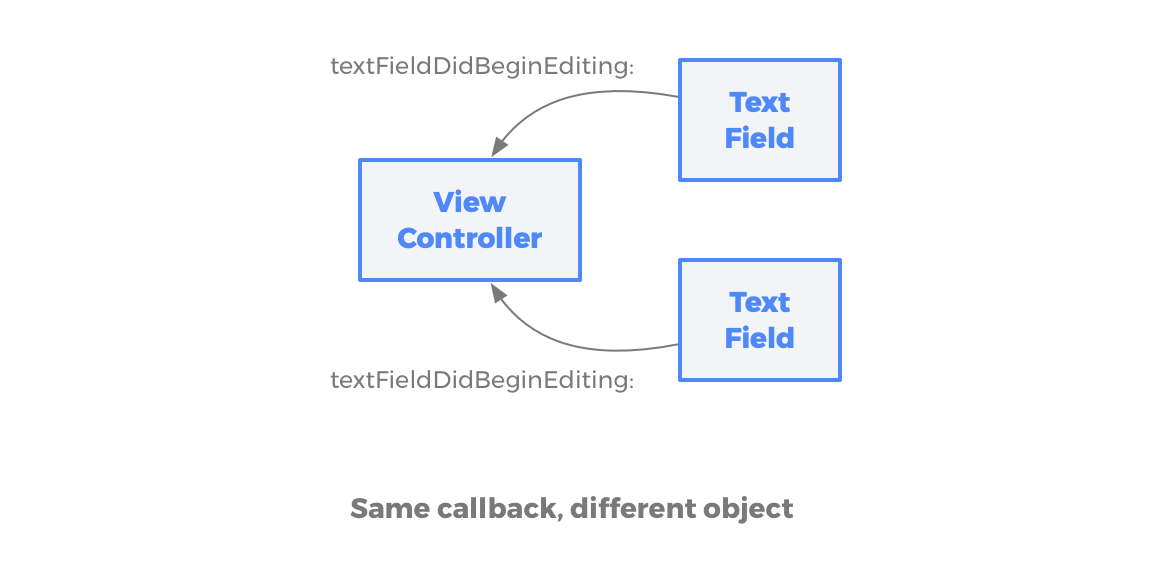
It’s a matter of convention, but it has a very real use: if a parent object is the delegate of 2 of the same kind of child objects, we need a way to be able to differentiate between which child a callback is coming from.
You could imagine a view controller that’s the delegate of 2 different UITextField. When a delegate method is called on that view controller, we need to be able to figure out which text field is sending that message. Since we’re being passed the relevant UITextField as a parameter, we can use that information to compare to local copies of that variable.
Okay, back to our example. Let’s look at how I call this delegate method:
protocol MyChildViewControllerDelegate: AnyObject {
	func didSelectButton(in controller: MyViewController)
}

class MyChildViewController: UIViewController {
	weak var delegate: MyChildViewControllerDelegate?

	@IBAction func handleButtonTapped(sender: UIButton) {
		delegate?.didSelectButton(in: self)
	}
}
Simple enough, right? In the IBAction of my button, we tell the delegate that the button was selected, and we pass in self as the controller parameter. If a delegate is set up, it’ll call didSelectButto(in:) on it. If not, nothing will happen.
A concrete implementation
Now let’s have a look at something a little more involved: a login form!
You’ve probably seen dozens of these. Let’s see if we can decouple the view controller (which handles the UI) from the business logic of logging in, which is contained in its parent.
The inputs, in this situation, are the username and password of the user, as well as the button tap on “Sign In”. Once user taps on the “Log in” button, we want to notify the parent view controller. That’s our output.
Here’s how we could model this:
protocol LoginViewControllerDelegate: AnyObject {
	func didTapLogin(username: String, password: String, in controller: LoginViewController)
}

class LoginViewController: UIViewController {
	weak var delegate: LoginViewControllerDelegate?

	var usernameTextField: UITextField
	var passwordTextField: UITextField
	var loginButton: UIButton
}
Simple enough, right? We’ve created a delegate protocol called LoginViewControllerDelegate that will define the contract between our LoginViewController and its delegate.
So far, so good. Now, what could we do if we only wanted to enable the login button when a username and password are entered? And there’s a catch: this business logic shouldn’t live inside this view controller. It’s the delegate that should decide. How can we achieve this?
Let’s add a second method to LoginViewControllerDelegate:
func shouldEnableLoginButton(in controller: LoginViewController) -> BoolWe can call this every time the text in one of our UITextFields changes, and our delegate can react to whether or not we can now log in. Since this method returns a bool, so we can use that return value to enable or disable our button.
Want the complete code sample? You can grab it at the end of the article!
Tying all of it together
I always like to think about view controllers as black boxes. What goes in and what comes out? From the point of view of the rest of your app, this is what we need to answer.
In Objective-C, the interface to a class and its implementation are separate files. I felt that this was a great tool to understand how a class could be seen from the outside. Luckily, in Swift, you actually have a similar view in Xcode! All you need to do is open the assistant editor and select counterpart -> myfile.swift (interface).

This allows you to see, at a glance, what the rest of your application sees. How much can you glean from this view? Are you able to understand what your class does by simply looking at its name, its public interface and delegate methods?
If you are able to easily understand the inputs (passed in through the initializer or public properties) and the outputs (exposed through the delegate protocol), there’s a good chance that the interface to your class is sound.
This is why I like the delegate pattern so much. It makes me feel like I’m building a self-contained block that will plug into my application. It makes me feel like I’m designing code, as opposed just throwing code onto the screen.
I hope that the next time you build a class that communicates through a delegate, you’ll feel more focused on the task at hand. All you need to do is make sure that the class itself does its work and calls its delegate at the right time. Not only is that easy to reason about, but it’s also simple to test.
Properly using the delegate pattern is more than just calling out to a protocol. It’s about designing the public interface of your object in order to create something easy to use.
I hope this article was able to illustrate not only how to create and use delegates in day-to-day development, but also how they fit into the bigger picture iOS app architecture.